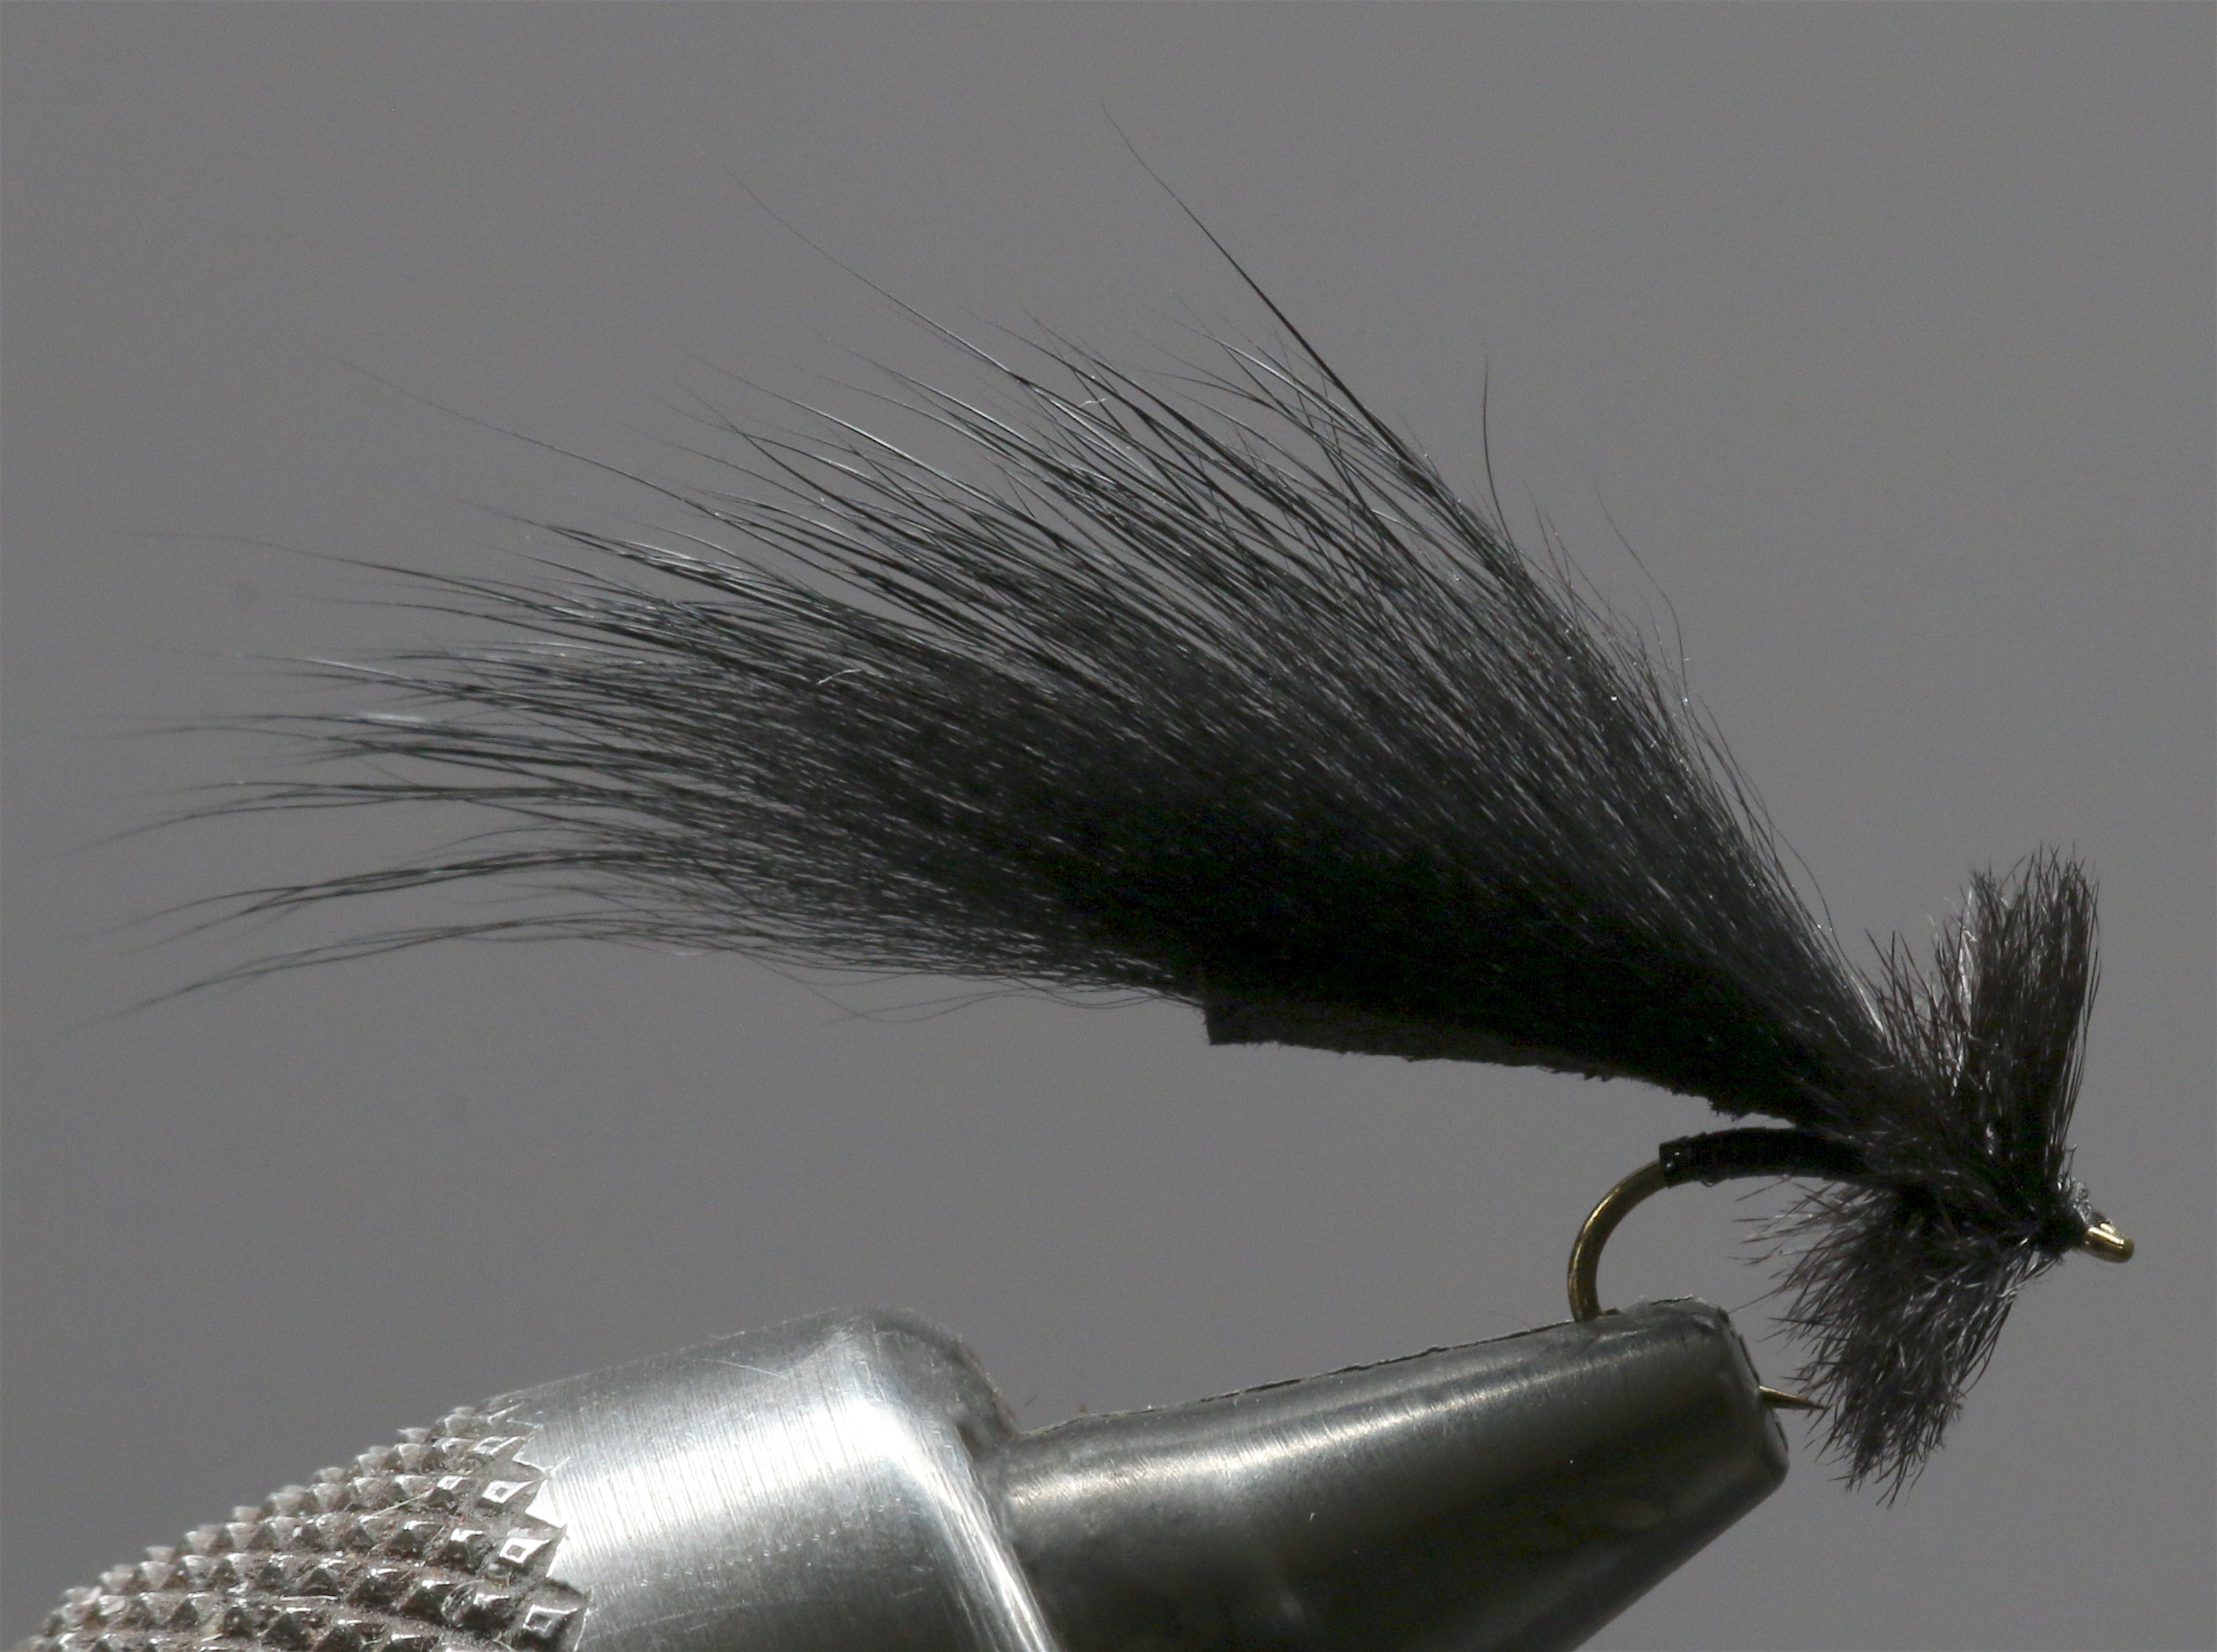
Angler’s Eye Media presents their latest adventure searching out one of the strongest, most aggressive fish on the planet – the mako shark. Off the Coast of southern California exists one of the world’s top mako fisheries. With speed, strength, and what may be the most acrobatic aerials on the planet the mako will test not only their gear and knowledge, but also your will and determination to find and catch these world-class apex predators. Only at the International Fly Fishing Film Festival in 2018!
Focus | IF4 Original
An inspirational fly-fishing film about an adventerous couple pursuing their passion, which leads them on a memorable adventure under a smoke soaked skyline in search of the perfect image of oversized dry-fly sipping rainbows. For those who’ve never had a trout rise to a dry, a fish might just be a cold-blooded creature with fins and spots, but to you and I they’re the objects of our memories, of our pictures, of our attention. They’re why, as we leave the river, we’re already dreaming about the next trip. Featuring our friends Darcy Toner and Timbre Pringle of Faceless Fly Fishing. Only at the International Fly Fishing Film Festival in 2018. World Premiere at The Fly Fishing Show in Denver!
Gawesworth Discusses Desired Loop Shape
In RIO’s newest “How To” instalment, brand manager Simon Gawesworth demonstrates proper loop formation and also talks about common casting stroke flaws. The video is a beneficial seven minute investment for any angler who wants to improve on their casting fundamentals.
Confluentus | Capture Adventure Media
Its that time of the year – time to start releasing trailers for the 2018 Official Selections! First up an epic release from Gilbert Rowley of Capture Adventure Media with Confluentus: The Merging of All Things, three friends strap on backpacks to earn the opportunity to pursue bull trout in one of their last bastions within a pristine wilderness. Merging different backgrounds and unorthodox fly-fishing techniques, they experience a fishing trip that piscatorial dreams are made of. Come share it with them only at the International Fly Fishing Film Festival in 2018!
Friday Fly By…Mike Schmidt

The great thing about big streamers is that, because of their bulk, it doesn’t take too long to fill up an average sized fly box. The tough thing about streamers is that it’s easy to lose a bunch over the course of the day. Here’s the Junk Yard Dog to help deal with the loss.
Junk Yard Dog Recipe:
Thread: UTC140 denier, brown
Back Hook: Gamakatsu SP11 3L3H size 1
Front Hook: Gamakatsu B10S size 2/0
Tail: Marabou, tan
Body 1: Polar Chenille, UV Copper
Body 2: Marabou, tan
Body 3: Arctic fox tail, rusty brown
Body 4: Arctic fox tail, dark tan
Head: Senyo Laser Dub, dark tan
Eyes: 8mm Clear Cure Dumbbell eyes, steel
Connector: Beadalon, 19 strand .018″
STEP ONE: With the back hook in the vise, start the thread and wrap it to about mid-shank. Secure a single marabou feather, leaving it hanging off the back of the hook approximately one shank-length. Clip the excess about an eighth of an inch behind the eye and bind the feather to the top of the hook shank. Finish with your thread at the rear of the shank. Then tie in the Polar Chenille opposite a spot between the hook point and the barb, and wrap your thread forward nearly to the eye. Palmer the Polar Chenille forward, taking care not to bind any of the pieces to the shank. Once behind the eye secure the material with a few tight wraps of thread, then clip the excess.
STEP TWO: Make a marabou veil over the back hook. Prepare the marabou feather by coming down from the tip and trimming out the top by clipping the center stem at the point where the fibers are long enough to reach past the Polar Chenille once wrapped. To form the veil, hold the marabou on top of the hook shank and use the thread tension to spin the marabou, similar to the way you spin deer hair. Once the marabou is all the way around the hook shank, carefully trim the butt pieces behind the eye and make a few wraps over them, advancing your thread to just behind the eye of the hook.
STEP THREE: Take a pinch of Arctic fox tail and tie it in with the tips hanging out over the eye of the back hook. Use your thumb to reverse the Arctic fox tail back over the rear hook and then bind it down on top of the shank with a half dozen wraps, creating a tidy bullet-shape. Whip finish over those wraps and the back hook is complete.
STEP FOUR: To connect the rear hook to the front hook, use a four-inch piece of 19-strand, .018″ Beadalon, with a few beads to close the gap. Place the front hook in the vise and secure it with crossing wraps up and down the shank of the hook. Make sure that the loop is vertical in the back once bound down so the rear hook will have unimpeded movement.
STEP FIVE: Wrap the thread forward about one third of the hook shank and then add the marabou for the mid-body section. Take two fluffy marabou feathers and hold them on top of the hook shank, then use the thread tension to help spin them to encircle the shank (similar to the way you formed the veil on the rear hook). Once the marabou is spun around the shank make a few security wraps before trimming the excess, then wrap over the butt sections. Figure-eight a set of dumbell eyes on the underside of the hook shank. The front edge of the eyes should be just back of the eye of the hook.
STEP SIX: To give the front hook bulk, hollow-tie a fox tail collar. At about mid-shank take a clump of lighter coloured Arctic fox tail and spin it around the hook shank, with the tips out over the eyes. Once spun in place work your thread through and make a few wraps at the base of the hair, then advance your thread about to the rear of the dumbbell eyes. Just behind the eyes spin in a second, darker clump of Arctic fox tail, hollow-tied as you did with the first clump.
STEP SEVEN: To create the head of the fly, clump-tie in four stacks of dark tan Senyo Laser Dub. Tie in one stack on top of the hook shank just behind the eyes, then one on the bottom of the shank. Then tie in a stack on the bottom of the shank in front of the eyes and finish with one more stack on top of the shank in front of the eyes. Pull all the Laser Dub back out of the way and whip finish right at the eye of the hook.
STEP EIGHT: To finish the head of the fly, make two cuts. Hold the Laser Dub vertical and make one cut from the eye of the hook on a downward angle just below the dumbbell eyes, and then make the final cut from the eye of the hook on an upward angle just above those eyes. The result is a wide wedge-cut head that pushes water and makes the fly move well when retrieved.
Gear Review: Orvis’ New Ultralight Waders

From jackets, to boots, to waders, Orvis added a number of new wading options this year. Members of the Fly Fusion team tested the Ultralight Convertible Waders over the last number of months and thoroughly appreciated the comfort of the new design. The waders have a better overall fit especially in the midsection where Orvis removed unnecessary bulk. Testers also appreciated the easily adjustable shoulder straps and the FIDLOCK SNAP used to allow for an easy conversion of the chest section of the wader from the chest position down to the waist. Designers also streamlined the gravel guard at the bottom of the wader so as to reduce drag and water collection. The Orvis wader redesign includes both men’s and women’s models, and they’ll be available in January for a very respectable price ($298 US).
Gear Review: The H3
For the last number of months Fly Fusion team members have been casting the Orvis H3 and are overly impressed by the rod’s unique feel and superior tracking. Orvis set out to create a more accurate casting rod and they accomplished that though the design process. By strategically reinforcing the blank, designers were able to further dampen the vibration in the rod, so it has an incredibly smooth feel when it straightens up from a loaded position. The H3 is available in a variety of different weights and two different flex styles. The H3F is designed for a caster who appreciates a deeper bend in the rod through the casting stroke; whereas, the H3D is a faster rod designed to throw larger flies greater distances.

Friday Fly by…Skip Morris

Every fly angler who’s ever cast to a persnickety trout knows you can never have too many mayfly patterns, so here’s a proven performer just in case you find yourself at your bench this weekend.
Morris May Light Recipe (by Skip Morris)
HOOK: Light wire standard length to 1X long, sizes 20 to 10.
THREAD: Tan 8/0.
TAIL-SHUCK: Tan Anton yarn (or any shiny yarn).
ABDOMEN: Buoyant tan dubbing (Superfine Dry Fly, Fly-Rite poly dubbing…).
WING: Gray poly yarn.
HACKLE: One, ginger or barred ginger.
THORAX: The same dubbing as in the abdomen.
Tying Instructions:
- Start the thread about three quarters up the shank. Bind a thin section of shuck-yarn atop the shank; bind the yarn down the shank to the bend. Trim off the front stub-end of the yarn. (Or make split hackle-fiber tails around a tight ball of thread-turns at the bend.)
- Dub a slim, slightly tapered abdomen from the bend to slightly past halfway up the shank.
- Double a thin section of poly yarn over the thread, slide the loop of yarn down atop the shank directly in front of the abdomen, and bind it tightly with a few tight turns of thread.
- Draw the ends of the yarn up and work a few turns of thread around the base of the yarn to gather the ends together. Give the yarn a hard push at its base to angle the yarn back.
- Use your hackle gauge to find a hackle of proper size for your hook. Strip the soft and overlong fibers from the base of the stem. Bind the hackle, by its bare stem, in front of the wing. Trim off the butt of the stem.
- Dub a rough, full thorax to just short of the hook’s eye.
- Spiral the hackle in four to six turns over the dubbed thorax to the eye. Build a tapered thread head, whip finish and cut the thread.
- Draw back the wing yarn, and then snip it to a squared end to a bit longer than the length of the shank. Trim the shuck-yarn. Trim the hackle fibres off beneath the thorax, either to flat or to angle down in a shallow “V.” Add head cement.
RIO Features Simon Gawesworth in Latest “Behind the Brand” Video
In this instalment of RIO’s “Behind the Brand”, Simon Gawesworth heads out to Lake Merrill, which is situated in the foothills of Mount St. Helens. Spoiler alert: In true Gawesworth fashion, he makes some monstrously beautiful casts and catches lots of trout. Check it out below.